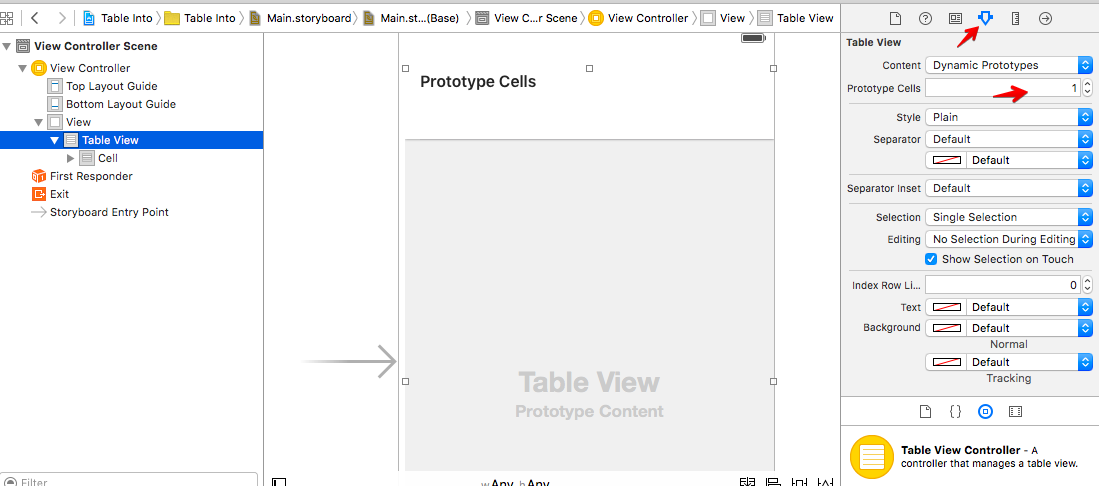
প্রায় অ্যাপে টেবিল ভিউ ব্যবহৃত হয়। আমরা দেখব কিভাবে টেবিল ভিউ ব্যবহার করা যায়। একটা প্রজেক্ট তৈরি করে নিব প্রথমে। এরপর Object Library থেকে TableView মেইন স্টোরিবোর্ডে যুক্ত করি। Table View টি সিলেক্ট করে Attributes Inspactor থেকে Prototype Cell ভ্যালু সেট করে দিব 1. নিচের ছবিটি দেখিঃ
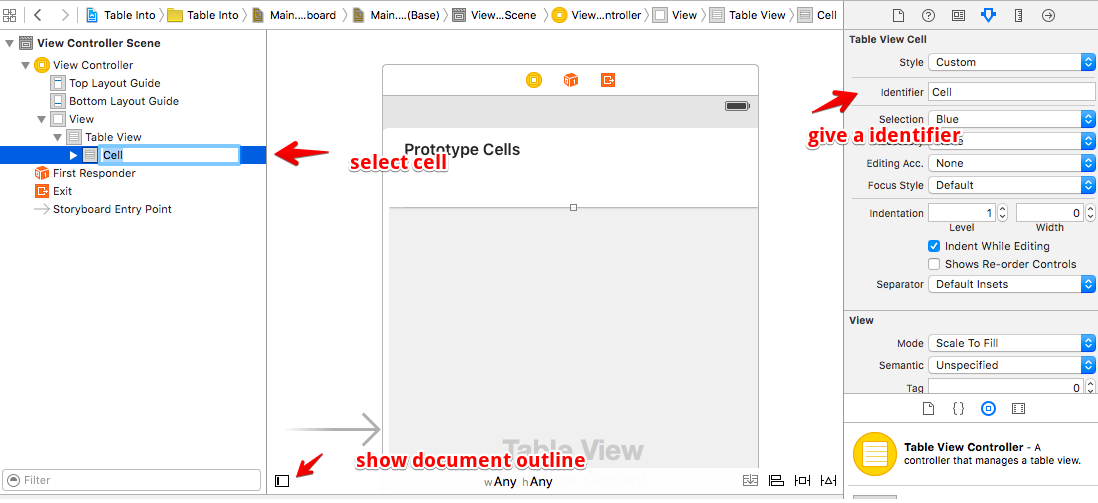
Document Outline শো করি। Cell সিলেক্ট করে Attributes Inspector থেকে Identifier থেকে একটা ভ্যালু সেট করি। এ ভ্যালুটা আমাদের দরকার হবে। এখানে আমি দিয়েছি Cell.
Assistant Editor এ ক্লিক করে আমাদের টেবিল ভিউ ViewControlar.swift এর সাথে outline হিসেবে যুক্ত করি। যে কোন একটা নাম দিতে পারি। এ উদাহরণে দিলাম tableView.
আমরা এই অ্যাপে টেবিলে বাংলাদেশের প্রধান শহর গুলোর লিস্ট দেখাবো। বাংলাদেশের প্রধান শহর গুলোর একটা অ্যারে তৈরি করে নি।
টেবিল ভিউ ব্যবহার করার জন্য আমাদের দুইটা মেথড অবশ্যই ইম্পপ্লিমেন্ট করতে হবে। সে গুলো হচ্ছেঃ
    func tableView(tableView: UITableView, numberOfRowsInSection section: Int) -> Int{


    }

    func tableView(tableView: UITableView, cellForRowAtIndexPath indexPath: NSIndexPath) -> UITableViewCell{


    }
আমাদের সম্পূর্ণ ViewControllar.swift:
import UIKit

class ViewController: UIViewController, UITableViewDataSource, UITableViewDelegate {

    @IBOutlet var tableView: UITableView!

    var cities = ["Dhaka", "Chittagong", "Sylhet", "Rajshahi", "Khulna", "Barisal", "Rangpur"]


    override func viewDidLoad() {

        super.viewDidLoad()

    }

    override func didReceiveMemoryWarning() {
        super.didReceiveMemoryWarning()

    }

    func tableView(tableView: UITableView, numberOfRowsInSection section: Int) -> Int{

        return cities.count
    }

    func tableView(tableView: UITableView, cellForRowAtIndexPath indexPath: NSIndexPath) -> UITableViewCell{

        let cell = tableView.dequeueReusableCellWithIdentifier("Cell", forIndexPath: indexPath)

        cell.textLabel?.text = cities[indexPath.row]

        return cell
    }


}
এখন যদি আমরা অ্যাপটি রান করি, তাহলে আমরা সুন্দর একটা টেবিল দেখতে পাবো।
টেবিলের প্রতিটা আইটেমে আমরা ক্লিক করলে কি কাজ করবে, তা আমরা সেট করে দিতে পারি। তার জন্য আরেকটা মেথড ইমপ্লিমেন্ট করতে হবে। তা হচ্ছে didSelectRowAtIndexPath। এই ডেমো অ্যাপের জন্য যে কোন রোতে ক্লিক করলে তা কনসোলে প্রিন্ট করবে। সম্পুর্ণ ViewControllar.swift:
import UIKit

class ViewController: UIViewController, UITableViewDataSource, UITableViewDelegate {

    @IBOutlet var tableView: UITableView!

    var cities = ["Dhaka", "Chittagong", "Sylhet", "Rajshahi", "Khulna", "Barisal", "Rangpur"]


    override func viewDidLoad() {

        super.viewDidLoad()

    }

    override func didReceiveMemoryWarning() {
        super.didReceiveMemoryWarning()

    }

    func tableView(tableView: UITableView, numberOfRowsInSection section: Int) -> Int{

        return cities.count
    }

    func tableView(tableView: UITableView, cellForRowAtIndexPath indexPath: NSIndexPath) -> UITableViewCell{

        let cell = tableView.dequeueReusableCellWithIdentifier("Cell", forIndexPath: indexPath)

        cell.textLabel?.text = cities[indexPath.row]

        return cell
    }


    // Check if selected
    func tableView(tableView: UITableView, didSelectRowAtIndexPath indexPath: NSIndexPath) {
        tableView.deselectRowAtIndexPath(indexPath, animated: true)

        let row = indexPath.row
        print(cities[row])
    }


}